The Scanner
The Scanner utilizes an Android App with the capability to scan in data and edit some fields. The scanner will use WiFi or 3G to connect to the APIs. All interaction of the scanner will be via JSON based APIs with exception of displaying of jpeg images, which is accessed via https URLs.
STEP 1 – Login Screen
Dropdown API Calls for every dropdown box (see online documentation for updated version). These are best cached in the scanner app, as they change very rarely, so network traffic is minimized:
- LabelsForScanner ← (FOR PAGE 1 & 2 – UI text labels)
- LanguagesForScanner ← (FOR PAGE 1– small flag images in base64)
- GlobalSettingSelect ← (FOR PAGE 1,– support contact info)
- StorageProviderCodes ← (FOR PAGE 1, – assigned vault physical address)
- LoginListByScannerID ← (FOR PAGE 1, – logins)
- BrandCodes ← (FOR PAGE 2 – maximum BrandName is 20 char)
- EventTypeCodesByRFID ← (FOR PAGE 2)
- ItemTypeCodes ← (FOR PAGE 2 – maximum scanner event is 10 char)
- MetalCodes ← (FOR PAGE 2 – maximum scanner MetalName is 9 char)
- MeasurementUnits ← (FOR PAGE 2 – maximum scanner measurement is 10 char – could be limited to 4 chars using acronyms)
For Login use “TSHDude”, pass “TSH123” for now. You can see new accounts and plaintext passes during development via LoginListByScannerID.
Here are some key procedure descriptions:
| Call | Response |
|---|---|
| LabelsForScanner returns a list of strings used for labeling controls and user messages for the scanner Interface based in the language specified in the languageid parameter. Call Example: [SERVER]/API/DropDownValues/LabelsForScanner?languageid=en&entityid= | 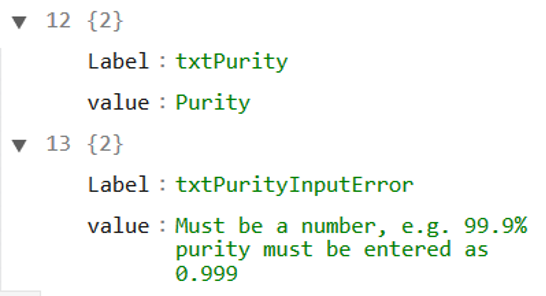 |
| GlobalSettingSelect Returns a list of variables and settings and can be filtered by name or category. For example category “contact” will return the support email and phone numbers. Empty parameters will return all rows. Call Example: [SERVER]/API/DropDownValues/GlobalSettingSelect?languageid=&entityid=&SettingName=&Category=&callerid=UserID |  |
| LoginListByScannerID Returns authorized logins and passwords for a given scanner location. Use as login dropdown. Passwords is an FYI only (don’t use) field and will be removed or replaced by a hash. Call Example: [SERVER]/api/secured/LoginListByScannerID?languageid=en&entityid=&callerid=UserID&scannerid=123456 | 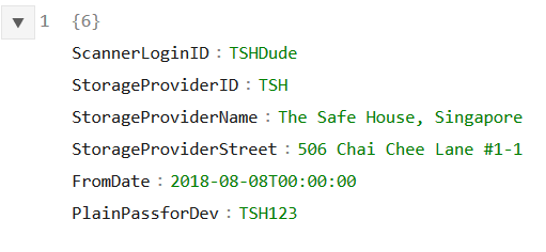 |
| StorageProviderByScannerID returns the vault (strorageprovider) where the scanner is assigned to. Call Example: http://localhost:59974/api/secured/StorageProviderByScannerID?languageid=en&entityid=&callerid=UserID&scannerid=123456 | 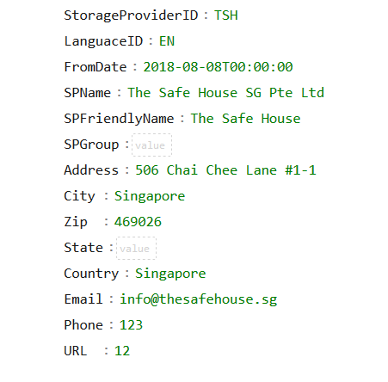 |
Doing a Login API call to authenticate scanner users:
- LoginAndGetCallerID
| Call | Response |
|---|---|
| LoginAndGetCallerID Used to check login credentials. Check for “StatusCode” “Success” Call Example: [SERVER]/api/secured/LoginAndGetCallerID?languageid=en&entityid=&login=TestMe&scannerid=&password=12345TEST&app=scan | 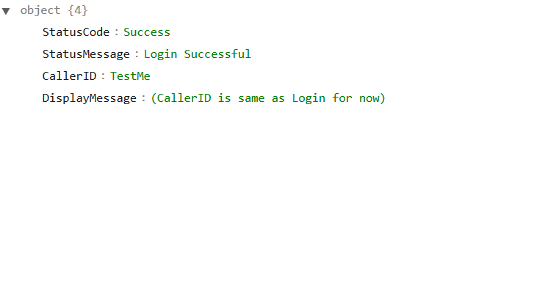 |
When the Scanner App starts it should allow users to:
- Provide a Login Page showing:
- ScannerID label (needs to be hard-written somehow)
- UserName Field
- Password Field
- Chose Language ability (English is the default, English will autoload).
- Load the DropDownValue APIs above using the selected language code and cache the dropdown lists. These fields will not need to be updated until the next re-start (unless the language is changed).
STEP 2 – Insert Screen
API Interface – RFID Specific
| Call | Response |
|---|---|
| EventTypeCodesByRFID This procedure provides the text and EventTypeCode for the two event Buttons at the bottom of the screen. They also indicated whether the buttons for a specific RFID should be enabled or not. Call Example: [SERVER]//API/DropDownValues/EventTypeCodesByRFID?languageid=en&entityid=&callerid=UserID&RFID=&app=scan | 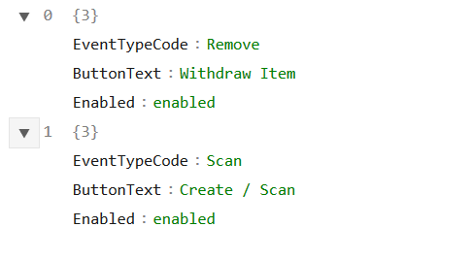 |
| GramChainSelectViaScanner Use this procedure to get Data for a given RFID. The procedure is specific to the scanner and we can add or remove fields as needed. It roughly mirrors the GramChainInsertViaScanner insert parameters. This is used instead of GramChainSelectViaScanner which is used for heavier WEB interfaces. Call Example: [SERVER]/api/secured/GramChainSelectViaScanner?languageid=en&entityid=&callerid=UserID&asoffate=&rfid=12lldd7887777 | 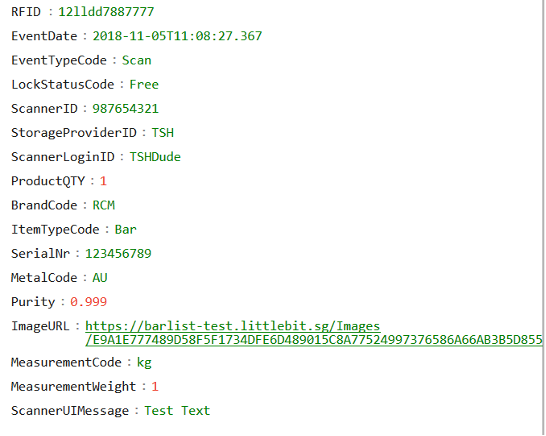 |
| GramChainInsertViaScanner Use this procedure to write Data for a given RFID Event. This is the only Insert API the scanner needs to call. Call Example: [SERVER]/api/secured/GramChainInsertViaScanner?rfid=1234567890&eventtypecode=Scan& scannerid=987654321&productqty=1&brandcode=RCM& subbrandcode=&itemtypecode=Bar&serialnr=123456789& metalcode=AU&MeasurementCode=g&MeasurementWeight=1&purity=0.999&macaddress=00 | 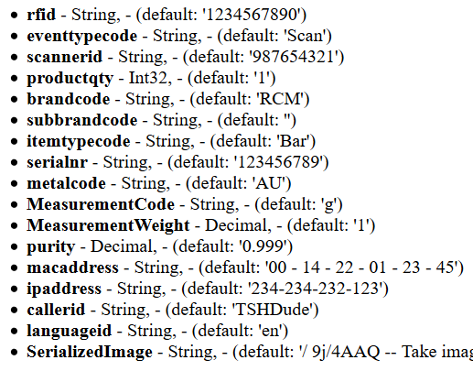 |
By default, the scanner should be in single scan mode or multiple scans are listed and a single RFID is chosen. When an RFID is scanned (selected) the following should happen:
- The GramChainSelectViaScanner API is called using languageID selected, asOfDate should be the current UTC date and time, rfid should be the RFID that was just scanned, uniqueSerial should be empty “” and CallerID will be the CallerID value returned by the login value.
If the API returns no rows then it means that this is a new RFID and the interface should go into “NewParcel” mode and the user will need to insert parcel data and a photo.
- Next step button – “Create Parcel”.
If the API returns a row then populate the interface fields with the data returned.
- Next step button – “Audit/Edit Parcel”
- Next step button – “WithDraw Parcel”
- Once the fields are all set and a photo of the item is present:
- The GramChainInsertViaScanner API is called to write the new entry
- The GramChainInsertViaScanner API is called to write the new entry
- A new RFID can be chosen and the process is repeated.
Login Functionality UI (Step 1)
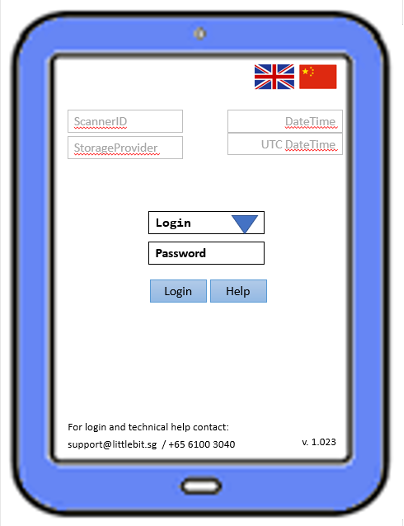
Login Screen
- LanguageID fixed to “en” / “ch”
- ScannerID must be hardcoded to the app
- StorageProvider via StorageProviderCodes
- Login list via LoginList
- Datetime is local time
- UTC is UTC time. System standard time
- btnLogin calls LoginAndGetCallerID
- btnHelp link Littlebit.sg\GramChainLoginHelp
Note that labels must be variable into Chinese and English depending on LanguageID.
App must keep track of:
- LanguageID =”en” by default
- ScannerID = “Scanner Specific”
- CallerID (once logged in)
- EntityID (fixed “scan” value)
RFID Scan Promt UI (Step 1.5)
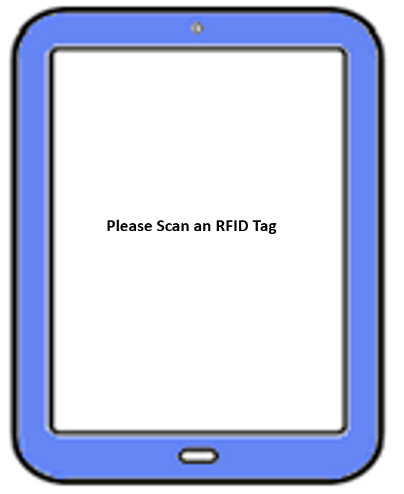
Intermediate Functional Page
Please design / proceed as you see best.
Insert Functionality UI (Step 2)
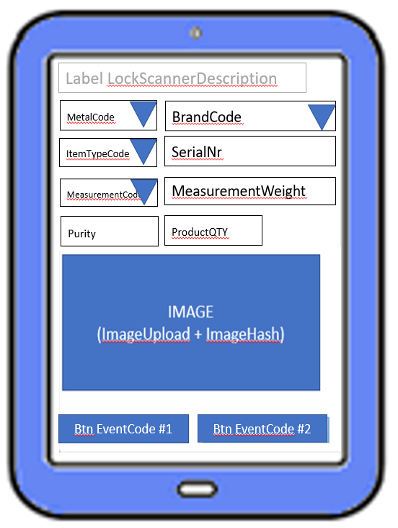
The App only calls GramChainInsertViaScanner Parameters needed are bolded plus the following:
- rfid - String, - (default: '')
- eventtypecode - String, - (default: 'Scan')
- scannerid - String, - (default: '987654321')
- itemquantity - Int32, - (default: '1')
- brandcode - String, - (default: 'RCM')
- itemtypecode - String, - (default: 'Bar')
- serialnr - String, - (default: '123456789')
- metalcode - String, - (default: 'AU')
- measurementcode - String (e.g. “kg”)
- measurementweight - Decimal, - (e.g.‘1’)
- purity - Decimal, - (default: '0.999')
- macaddress - String, - (default: '’)
- ipaddress - String, - (default: '’)
- callerid - String, - (default: same as Login)
- languageid - String, - (default: 'en')
- SerializedImage – String (required only if there is no existing image, else optional)
The Scan Event
API Interface – RFID Specific
This is the default event for the scanner. If there is no existing RFID / Unique Serial entry then it will create a new parcel. Otherwise the event will be appended as the latest event to the parcel event history. Since almost all queries look for the latest data the latest event will normally be viewed which means that the scan event can be used to correct erroneous parcel entries. Note that, technically, data is never deleted or updated, instead a continuous event log is kept allowing past data to be seen at any moment in time. This can be done by specifying a past date/time in an “AsOfDate” query parameter.
Execution Conditions
Data must come from a valid scanner assigned to a valid vault. Furthermore, the Username and password for a valid login must have been provided.
A new scan event cannot have the same UniqueSerial, being a composite data set made up of metaltype, quantity, weight, itemtype, brand and serial number (e.g. AU1gBarRCM-123456789767) associated with more than one RFID. This rule prevents duplicates. If a parcel needs repackaging use the repackage event instead which will dispose of the old RFID entry and preserve parcel statuses.
A base64 serialized image is required if it is the first RFID entry. For subsequent entries the image hash is re-used. In other words a photo is required for new RFIDs.
A parcel cannot be removed if it does not have lockstatuscode “free”.
Prior Event cannot be of code “removed” or “repacktorn” as these effectively invalidated the parcel (end of live). Allowing a new event would cause duplication.
The Remove Event
API Interface – RFID Specific
This event is used when a parcel is permanently withdraw or otherwise to be removed from the vault. This event will end the parcel event chain and the parcel will no longer show up on queries past the Remove event
Execution Conditions
Data must come from a valid scanner assigned to a valid vault. Furthermore, the Username and password for a valid login must have been provided.
A new removed event cannot have the same UniqueSerial, being a composite data set made up of metaltype, quantity, weight, itemtype, brand and serial number (e.g. AU1gBarRCM-123456789767) associated with more than one RFID. This rule prevents duplicates. If a parcel needs repackaging use the repackage event instead which will dispose of the old RFID entry and preserve parcel statuses.
The remove event cannot be done if the parcel has a third party lock specified by a service provider. The lock would have to be released by the service provider before a remove event can be inserted.
The Repackage Event
API Interface – RFID Specific
RFID chips or tamper evident bags can be physically torn off or damaged thereby requiring a new RFID or SerialNR to be issued. The GramChain Scanner is using the “repackaging” functionality for such cases.
The API GramChainRepackageParcel is designed to handle such situations, requiring the following parameters:
- oldrfid – The RFID of the torn / invalidated parcel. If lost vault personnel can find the RFID by searching for the serial nr. In the GramChain explorer
- oldserial – The SerialNr of the old tamper evident bad or bar. Both entries are needed to avoid entry errors
- newrfid – the new RFID that will be used to identity the parcel in the future
- newserial – the new Serial, if applicable. This field will stay constant if the serial number is part of the parcel itself (e.g. a gold bar serial number) but could change if the ID was from a container such as a tamper evident bag.
- Serializedimage – should a new image be necessary the Base64 string would need to be re-uploaded. Otherwise the old image will be used.
- MetaData – the usual ID parameters such as CallerID, ScannerID, IPAddress etc.
All other data, such as parcel details and parcel usage fields, will be taken over from the old parcel and apply to the newly repacked parcel automatically.
The old parcel will have a “RepackTorn” event which will mark it as “invalidated” while the new parcel will have a “RepackNew” event which will start its event chain.
The procedure will only allow Repackaging events on existing parcels that have not been invalidated (defined as “Removed” or “RepackTorn” events)*. Note during first testing it is possible to have multiple repack events on invalidated parcels to facilitate testing. This will be removed once repack functionality is finalized.
Execution Conditions
Data must come from a valid scanner assigned to a valid vault. Furthermore, the Username and password for a valid login must have been provided.
The RFID and Serial Number of the old parcel (which was torn) must match an existing parcel in the system. The new RFID and optionally serial number will then be used to replace these fields. A new photo optionally can also be submitted.
A given parcel can only be repackaged once for a given RFID. Otherwise this would allow for duplicate entries to be created. A repackaged parcel with a new RFID can in turn be repackaged as long as a new RFID is applied.
The old and new RFID cannot be the same during a repackaging event.
Repackaging Reason
A reason for the Repackaging can be provided. This field will be populated by a dropdown box. The dropdown questions are part of the label from the LabelsForScanner API Filtered by language (e.g. “en”) and labelgroup “RepackageReason”. The Reason Code (Label name selected) is written into the RepackReasonCode parameter of the GramChainRepackageParcel.